Pages

Slider

Friday, February 22, 2013

Big Dog Daybed from Small Person Bed


With my new ugly duckling sofa set in the living room and the old, truly hideous set going out the door via Craigslist tomorrow, my dogs are a bit out of sorts. They've always been allowed on the furniture. Or more accurately, I was tired of fighting about it and my couches hid dirt beautifully. That was fine except for the fact that no people sat on the couches because they were always full of dog hair. I had to vacuum them daily just to keep it to a manageable level. We had some very large, expensive pet beds. The new set is much lighter-colored, so we're ushering in a new era. No dogs allowed. Now, that doesn't mean they don't get treated fairly. I had to come up with something to entice them away from the lure of beige canvas. They already had "real" pet beds. Only one dog actually used them. We looked into getting one of those end tables which doubles as a dog crate, but it was $550 before shipping. No. I looked at Pinterest for ideas for making end tables into a pet bed, but they seemed to all be for small dogs. Our dogs are definitely not small. So, I'm sure you can guess where my quest led me. The thrift store, of course. I found this toddler bed at Salvation Army and thought both dogs could fit on it nicely. I was planning on spending at least $50 for two fancy new regular-store dog beds if I couldn't come up with anything else. This was $49.99. Perfect! I went to pay for it, it turned out to be half-price that day. Unbelievably awesome! I told you I'm having a stellar thrift store week. Here's what I did to make it fit into our new decor...
This is it, complete with waterproof crib mattress. It originally came from Ikea. Suckers.

To further entice the dogs to their new bed, I found this electric blanket at Goodwill to use as a mattress pad. Look how happy this couple is, gazing into the sunset, enjoying their "delightful moment."
I used about a can and a half of this. The shade is called "Eden." Ooo, so forbidden.

The first coat.

 All done. Just watching paint dry. Yawn.

I put the electric blanket on top of the mattress and added a brown crib sheet.  (Target  - $10) Then I made a few dog-friendly pillows I could easily wash. It's his own mini-couch!

Frank says, "Thanks for checking out this post!"


My Ugly Duckling

Here she is. You can see the little loveseat peeking out from behind. 
This has been the most stellar thrift store week I've had in a long time. I typically make a big trip to several Goodwill stores on Tuesdays with my baby, my mom, and my 101-year-old grandmother. Mom and I load up the stroller and the wheelchair and hit as many stores as we can before we get hungry for lunch. We're quite a sight to behold with our four generations of bargain-hunting women. I almost always come home with some great finds. This Tuesday, however, was terrible. I actually left one store without buying anything! This is unheard of in my world. So, on Wednesday, I was still eager to get my fix. I headed for the one Goodwill to which we hadn't gone on Tuesday. I should have known the Goodwill gods were just saving my budget for the greatest surprise ever! There it was, at the front of the store. The fabric was so dirty, I nearly passed it up. It was also missing the back cushions. This did not deter me. It was beautiful underneath all that surface dirt, and I was going to make it shine. It was a Bauhaus set, typically sold at Haverty's for around $1000 a piece. The very picture of "good bones." The loveseat was $46 and the sofa was $56. I quickly called up the hubs to ask if it was alright to lug home this diamond in the rough. Sometimes he doesn't quite understand my vision. This time, however, he said I had to go for it. Yay! Day made! So, out goes the old microfiber Rooms to Go sectional that never really fit in our odd-shaped living room. That thing collected dog hair like a job. I'm working on fixing up the new (to us) set. A good cleaning has made it look almost new. Back pillows are being sewn tomorrow. As soon as I get it back to pretty, I will share the "afters."

Wednesday, February 20, 2013

Clipboard Letters


E's room is pretty small, so I hadn't given a whole lot of thought to artwork for the walls when I was working on decorating. That's also due in large part to the fact that one of her walls looks like this...


Obviously the focal point of the room! Being home with her all the time, I'd started to notice the very blank other three walls. When I found these cute, mini clipboards at Goodwill for .77 each, I didn't really know what I'd use them for. There were five, which isn't conducive to a symmetrical wall display. But, I thought, E's name has five letters. And I habitually collect random letters from the thrift store. Strange, I know. I have a whole alphabet and letter soup in a box in the garage. It worked in my favor this time. Admittedly, I had to augment with a letter from Hobby Lobby because I only had one other E and it was way too big for the clipboard. So here's what I did...
These are so cute. About the size of a half sheet of paper.
Oh, Goodwill. How I love thee! 

Painting a few of 'em up to match her zig-zag wall.

Add a little glue and...

Voila!

Here she is, pondering life's mysteries beneath her name.


Friday, February 15, 2013

Always Be A Unicorn


I found this awesome black ceramic unicorn for a dollar a few weeks ago at St. Vincent DePaul Thrift Store. It was way too kitschy to pass up. I absolutely love it! I added it to E's room today along with this unicorn quote which has been floating around Pinterest lately. I just typed it up with a background that matches her room and put it in a thrift store frame I had in the garage. Good advice, I think. I mean, who doesn't want to be a unicorn?

Monday, February 11, 2013

Wings For My Angel


E is going to be six months old this Wednesday, and it had been too long since we had her pictures taken. With Valentine's Day just around the corner, I figured a cherub-theme would be appropriate and adorable. I am lucky enough to have a photographer in my family. My very talented niece, Leah, of Leah Catherine Photography (leahcatherinephotography.blogspot.com.) She's become our official family photographer. After she worked us in to her schedule, I set about making some props. I happened across some fairy wings at Goodwill for only .99! I knew I could re-work them into angel wings for almost nothing. Here's how everything came together.

Sparkly, purple fairy wings. Definitely well-loved in their previous life, but the perfect  frame for new angel wings
First I cut off all the old purple fabric, then I made covers for the larger set of wings from an old t-shirt.
I stitched around the edges, leaving space to turn them. Just like a pillow.
Then I bent the wire so I could slide them on  like a sock.
I molded the wings into a more angelic shape. 
Time to angelify! I used two small packages of marabou trim for the smaller wings and a  feather boa for the larger wings. With coupons, this cost about $8 at JoAnn Fabrics.

Using my trusty glue gun, I secured the trim to the top of the smaller wings.

Then I just wrapped the trim around the wire, using more glue when I reached the end. 
I also covered the purple felt at the top.
On to the larger wings. I cut the boa in half and then wound it around  the wings securing each end with glue.  I added a little more glue in the middle of the wings, fastening them directly to the t-shirt fabric.


Complete!
For the bow and arrow, I grabbed some chopsticks, felt, some random red electrical wire we had in the garage, and my glue gun. I cut two little hearts out of some polka dot felt and hand-stitched them together leaving a little room at the top to slide on the chopstick. I added a little glue before I put it on so the heart wouldn't end up in E's mouth. Then I cut two rectangles of pink felt for the top of the arrow, glued them on, and cut some fringe in. For the bow, I simply put some hot glue on either end of the chopstick and wound the wire over it.

If I hadn't found these fairy wings, I probably would have used either a wire coat hanger or some cardboard to make the wings. I would have just added two pieces of elastic to slide over E's arms like the fairy wings had. If I wasn't lucky enough to have Leah as my photographer, I would have set up some sheets in natural light and tried my best to capture E's cuteness myself. Leah did a much better job than I could ever do, of course. I am so happy with how everything turned out. E makes such a good little Cupid!


Here they are on my angel! 


Friday, February 8, 2013

Banquette from Bookshelves


I've wanted a banquette in my kitchen for as long as I can remember. I've worked in the restaurant industry for long enough to know that almost everyone prefers a booth. I almost managed to get a real restaurant booth for free. It was in terrible disrepair, and luckily my tactful husband talked me out of it. Still, pictures of banquettes kept haunting me from the pages of magazines. Seriously, those things are everywhere. I had to have one. Cheap and fast preferably. I figured if I could find some old cabinets or something at a thrift store I might be able to rig something up. I searched high and low. I even went to the Habitat for Humanity ReStore. Nothing. Just when I was about to hang my head in defeat, I looked over at a set of bookshelves that I've had in my kitchen forever. They were part of a Target furniture set that I got for a steal at a thrift store many years before. In a fit of inspiration, I pulled everything off of them and turned them on their sides. Unbelievably perfect. I just needed to haul out the jigsaw and paint. I cut off their legs (cruel, I know) and some trim around the top to level all the sides to make rectangular boxes. Then I painted everything that would show from the outside with a coat of glossy white. I thought I might have to put some feet on them to make them an appropriate chair-level. Fortunately, after comparing them with my kitchen chair measurements, they were right on. After the paint dried, I put them into place. The only step remaining was making a cushion for the top. I had another stroke of luck that the shelves had a 2 inch inset along the sides. I'd just need to get a 3 inch thick piece of foam cut to fit and upholster it and it would slide right in. If this hadn't been the case, I would have just used a piece of foam wide enough to cover the entire surface area and maybe attached it with Velcro. Because most of my cushion would be covered by the wood inset, I didn't waste time with making a cushion cover as I probably would have if more of it would show. I simply got out the glue gun and attached the fabric right to the foam. I made a few long pillows to put along the wall and added a few extra throw pillows I had to cover the corner seat. The only cost was foam and fabric - around $65. With some thrift store bookshelves, this project could still come in under $100. The best part is, I gained some much-needed kitchen storage as well. The old shelf openings back up to the wall. All I need to do is pull them out. Voila! The banquette of my dreams.


Thursday, February 7, 2013

Fabulous Stamped Floorcloth


With two large dogs and a very rainy winter, mud has been a constant in our kitchen lately. The rug I currently had under my kitchen island was a cheap, neutral Ikea special. I liked it, but it was always in dire need of a wash.  It's not really meant to be washed, so it was also falling apart. Now I either needed to buy a new rug which would ultimately come to ruin, or come up with another solution. Enter the fabulous stamped floorcloth. It has been treated with polyurethane and doused with Scotchguard. If all goes well, I should be able to just hose those muddy paw prints right off. Here's how I did it...


My original plan was to head to Big Lots for a canvas painter's dropcloth, which usually costs around $10. Not bad at all. Lucky for me, I decided to drop by St. Vincent DePaul Thrift Store on the way. I happened upon this piece of  lavender canvas for $6. Nice! I measured the current kitchen rug, cut it to the size I needed, then hemmed the edges with my sewing machine. 


I then washed it in the washing machine with hot water and put it the dryer. This made sure to remove any sizing that might inhibit the paint from sticking. After that, I ironed it very well. Any major wrinkles will only be magnified by the paint. Much like an old lady wearing too much makeup. I laid the pressed canvas out in my yard and painted both sides with some old paint I had in the garage, letting the first side dry before flipping it over. This step takes tons of paint. I used almost 3/4 of a gallon. I let the whole shebang dry overnight.  This primed the canvas for the fun part. 


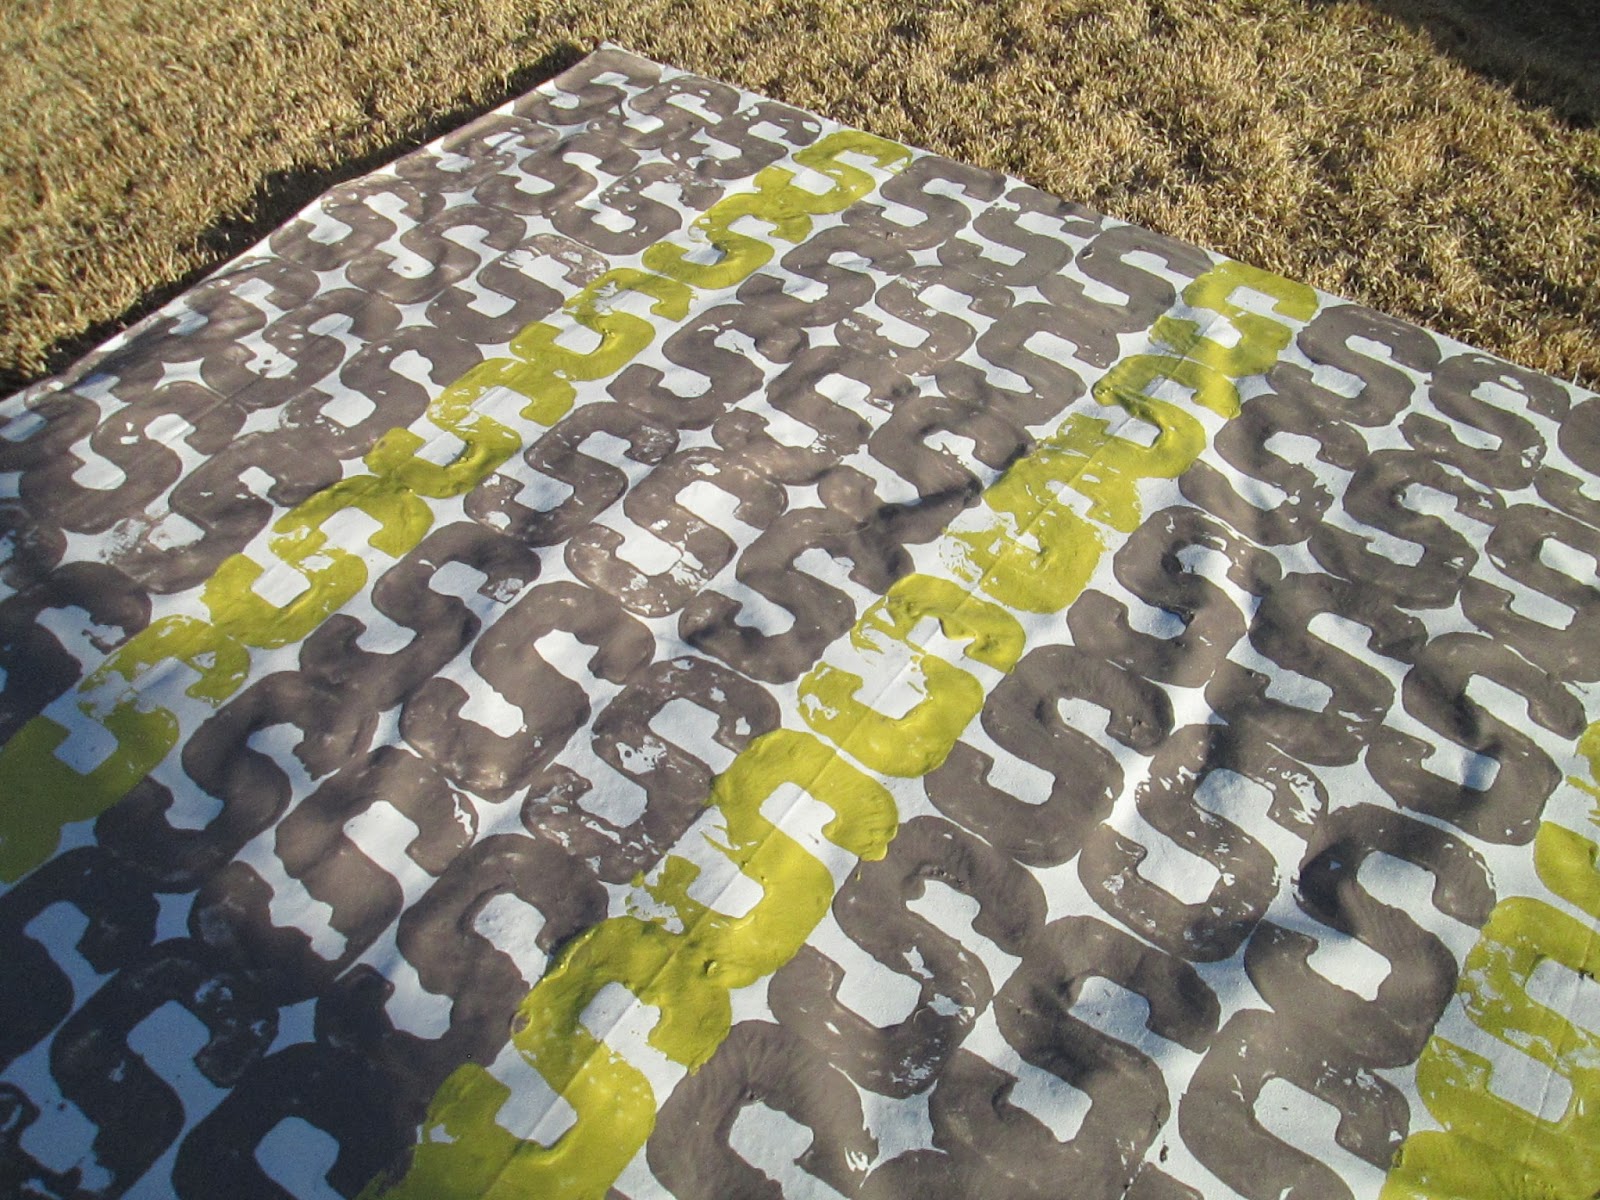
I had a hard time making up my mind about the pattern on the floorcloth. I knew I wanted to use the leftover paint from my kitchen walls, which are chocolate brown, but I also wanted the cloth to have a little pop of color. I'm really feeling chevron patterns right now, but I have a five month old baby. Hence, no time for detailed measuring and taping. This part had to be awesome but complete by the end of naptime. I searched my house for interesting things I might be able to use to stamp a pattern onto the rug. I finally settled on this cardboard "S" I had. "S" also happens to be the first letter of my last name, so yay! One of these can be had at your local craft or fabric store for next to nothing. You could totally use your monogram too, but I love the way the sideways "S" made a graphic squiggly pattern. An "M" or "W" would also look amazing. 

I moved the project to my driveway so I'd have a level surface on which to work. To stamp the pattern, I simply dipped one side of the "S" in paint, letting the excess drip off as much as possible, then stamped it onto the primed floorcloth. You don't need to make the stamps perfect. The imperfections really only add to the overall pattern. At least that's what I kept telling myself when an "S" was splotchy! To leave space for the pop of color I wanted, I used a paper cutout of the "S" as a spacer, leaving those rows blank. You could also measure the space you need, but I figured this might be faster. I was living on borrowed naptime.


After I finished with the brown paint, I rinsed off the cardboard "S" as best I could. I used some more leftover paint for this step. If you are using two or more colors, you might be better off buying letters for each paint color, or tracing the letters and making your own stamps. The cardboard was beginning to get a little mushy towards the end. Still, as you can see, it worked out pretty well. 


Here's the finished project! I let it dry overnight and then sprayed it down with polyurethane and treated it with Scotchguard. That was left to dry for several hours. A floorcloth can be more slippery than a traditional rug, so make sure to put one of those grippy rubber mats underneath to prevent accidents. Now I have a "rug" ready for those eight muddy paws.